Tjeneste-oppgradering: Følg linken for nærmere status vedrørende migrering, for generelle spørsmål og svar se vårt hjelpesenter.

Backup data from your web hosting account in cPanel


EXPERIENCING PROBLEMS WITH OUR SERVICES? RUN A DIAGNOSE FIRST TO SAVE YOURS AND OUR TIME

Added: 10.03.2014 23:26:29     Last updated: 31.01.2020 14:35:15

This guide details how to backup data from your web hosting account in cPanel, as well has how to proceed to recover it.

Step 1:
Click on the icon for "Backup" as shown in the screenshot below:

Take a backup in cPanel


Step 2:
There are several ways to take a backup on, depending on which files you want to back up. On the "Backup" page, like shown in the screenshot below, you basically have four alternatives:

  1. Click on the button "Download a complete backup of the website" to take a complete backup of all data on your web hosting account.
  2. Click on the button "Home folder" to only back up the files in the home folder on your web hosting account.
  3. In the list "Databases", click on the name of the database you want to take a backup of to take a backup of only that specific database.
  4. In the list "Forwarders" or "Filters", click on the subdomain or filter you want to take a backup of. For example, if you choose to click on a subdomain, only files under this subdomain will be included in the backup.
Choose desired type of backup


Step 3:
We will now move forward to take a complete backup by choosing point 1 from step 2 (Download a complete backup of the website).
Under "Complete backup":
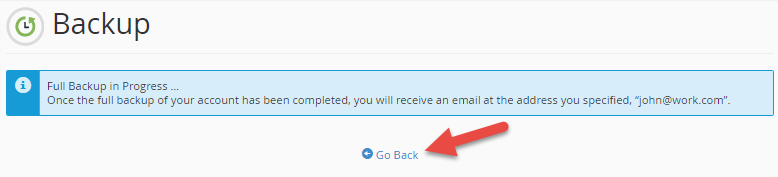
  1. In the field "Backup goal", choose the destination where the backup should be saved. In this example we have chosen "Home folder" which means the backup will be saved directly to the home folder on the account. You can also choose "External FTP Server" if you want to send the backup directly to an external FTP account you have access to. Independently on what you choose, you will have a backup saved at the destination chosen.
  2. Type an email address in the field "Email address" to get the information from cPanel regarding the backup. cPanel will automatically send an email to this email address when the backup is completed and saved at the destination. If you have specified contact information in cPanel, this will be the email listed by default.
  3. Click on the button "Generate backup" to start a complete backup of all data on your web hosting account.
Choose where the backup should be stored or sent


Step 4:
The backup has now begun. It may take a while until the backup is completed, depending on how much data is included in the backup. Click on the link "Go back" to go back.
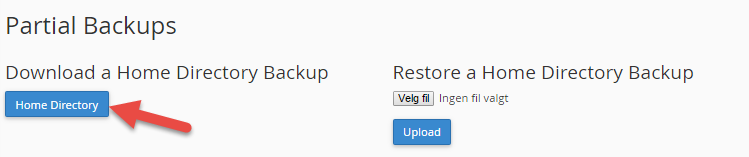
Backup is completed


Step 5:
We will now move on to take a backup of only the home folder by choosing point 2 from step 2. When you click on the button "Home folder" a zipped files will be downloaded to the local computer. In many cases you will be asked if you want to save or run the file. If so, choose "Save".

Backup of home folder


Step 6:
You can recover the backup from the same place you took the backup.
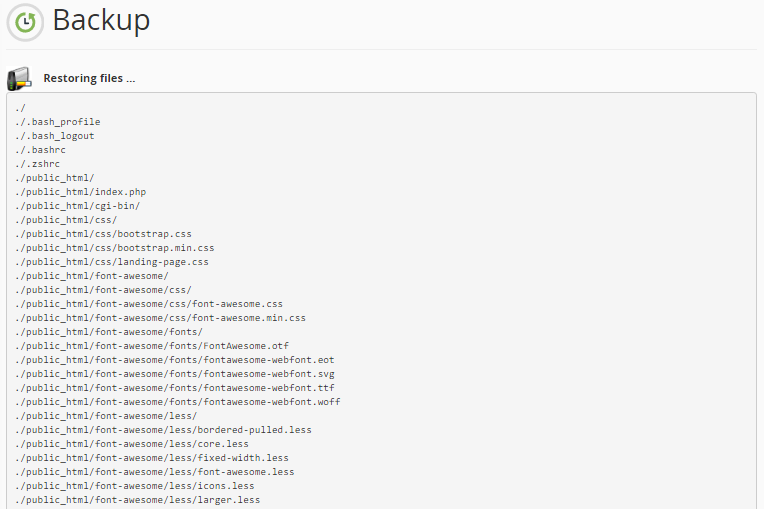
  1. Click on "Choose file", and choose the correct backup file from your local computer.
  2. Click on "Upload" to start the recovery.
Recover from backup file in cPanel


Step 7:
The backup has now been recovered.

Recovery of backup

Done
We have now been through how to take a complete backup. We have also taken a backup of the home folder and also recovered this backup. The process to perform and recover backups of databases, forwarders or filters, is the same as taking a backup of the home folder.